Fabricating the new Large bore exhaust system
After taking the IQ to a couple of car shows, a road racing guy who was looking over the car tells me the diameter of the tubing I had used to fabricate the original exhaust was too small.
After a taking some measurements and looking at the R1 stock and aftermarket systems I realized he was right!
I was never really happy with the stock DanMoto Y-pipe configuration anyway, it was not dividing the flow of gases equally and to be honest it sounded a little on the loud side. ( I mean REALLY loud..)
So here is how I overcome the issue, new mid pipe, new resonator, custom made Y pipe and a slightly quieter and better performing exhaust.
Here is how I did it..
The old version 1 exhaust system build page is here
Comparison of the old and new

2.5" stainless tubing
As the photo shows the connection between the headers and the mid pipe on the old system was way too small. Compared to the 2.75" inlet of the resonator
Fabricating the new Y-pipe

New Y-pipe
Using some 1.75" stainless tubing I fabricated a much better Y-pipe that equals out the flow of gases to both end cans equally.
Top right in the photo is the old setup.
The difference in tube sizes and flow

Tube sizes
The tubing on the left is the new large bore 16swg 2.5" dia stainless, center is the old 1.5" dia and on the right is the 1.5" dia DanMoto Y- pipe and how bad the flow was to the second end can.
Tig Welding up the tubing

Tig welding stainless
Once all the angles and joints had been worked out they were tig welded together (It was Argon purged on the inside during actual welding)
Re using the old end can joints

cutting off the old joints
In order to get a good fit and re use the slip on end cans I cut off the stock joints, I also cut off the spring retainer loops and re welded them on to the new system.
Mid pipe meets Y-Pipe

Mid pipe to Y-Pipe
The larger 2.5" mid pipe was welded to the 2 x 1.5" rear Y-Pipes.
This actually took a lot longer to do as each piece was tack welded and test fitted to see if routed correctly under the car. I tried to get a gradual curved fit so it all looked good.
Welding the old joints in place
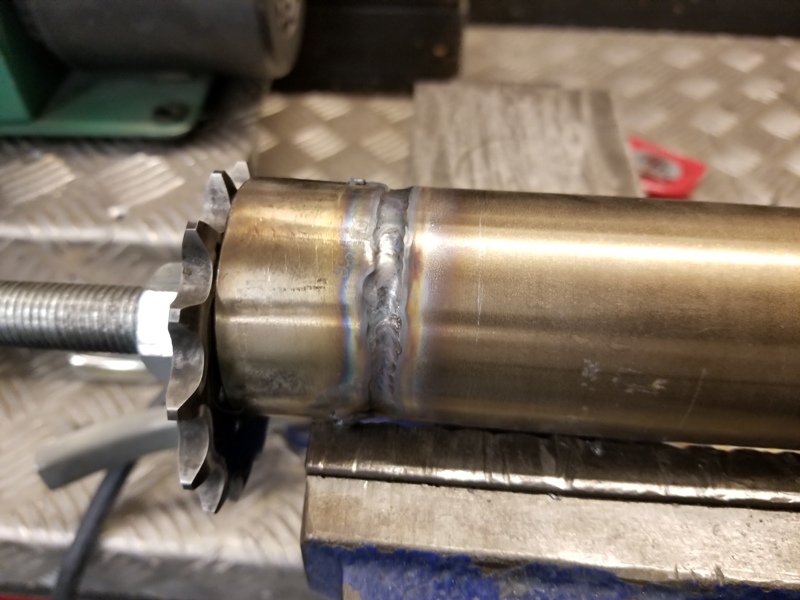
re using the joints
A piece of threaded rod and a couple of old sprockets used as a jig to line up both parts, this was done on both sides of the end can outlets.
Mid pipe resonator installed

10" resonator
I also went ahead and installed a resonator to further quieten down the sound. I needed to cut it down to fit the V-Band connector. Although it actually does not make the exhaust quieter it does change the tone of the exhaust note, so it is a little better that the loud rasp the original system made.
The V-Band connection

2.5" Stainless V-Band
I used a stainless V-Band connector to connect the mid pipe with the header down pipe section. This makes it a lot easier to remove whole system without disconnecting the headers joint.
Flexible coupling welded in

Stainless Flexible coupling
A short flexible coupling was welded in between the mid and header down pipe, this should help stop vibration from traveling through the exhaust and also help align the tubing up easier.
Welding the V-Band joint

welding v-band
Welding in the joint, pretty easy to do on nice new Stainless steel components.
Mid pipe resonator installed

My Stainless steel tig welding skills are not the best but with some practice and back purging the system with Argon, it turned out pretty nice. I would love to have a complete Titanium system though.
Matching up the joint sizes

Flaring
Flaring the end of the tubing to make a nice transition from the 2.5" tube to the slightly larger dia resonator outlet flange. Keeping the gaps tight made the welding much easier.
A nice transition

Transition
Nice clean joint ready to weld,
if only it was Titanium..

Complete finished exhaust
The complete system is ready to fit
After welding on the support hangers for the rubber mounts and tacking on the spring retainers for the rear end cans its ready to fit.
The new system before fitting it to the car
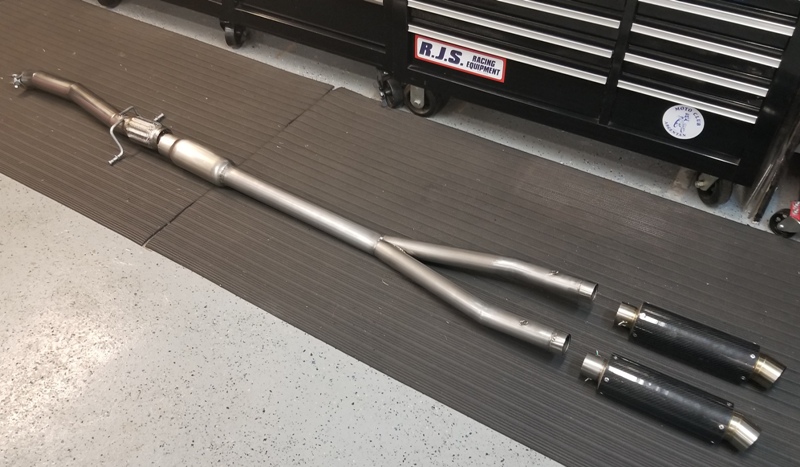
Ready for installation on the IQ-R1
The whole exhaust is constructed in 4 sections:
1) The modified Yamaha R1 titanium headers,
2) The 2.5" Headers down pipe with coupling
3) The 2.5" main mid pipe section
4) The 2 rear DanMoto Carbon Fiber end cans.
Fabricating the bends with a smooth gradual transition with larger diameter tubing are a big improvement over the old system.
Headers down pipe section

Headers down pipe
The Headers down pipe making use of the stock rubber mounts that were used to hold it in place.
The Installed system

Mid Pipe Installed
A single rubber mount for the rear of the mid section holds it in place.
I used Gold Hi-Temp reflective tape on the underside of the car to deflect some of the heat away.
Rear view of the system

Rear view
The rear end cans attached using the original spring retainers. The seal between the pipes and the cans is very tight. The mid pipe is also about 2" higher than before giving some extra ground clearance.
DanMoto Carbon Fiber end cans

DanMoto end cans
The end cans have a rubber mounted stainless steel bracket securing both of them to the underside of the rear valence of the IQ.
The white square light mounted between them is a hi-visibility flashing LED rain light that I designed and then 3D printed, it also covers the gap nicely between the 2 end cans.
Short video showing the startup
Here is a video showing how the new system looks and sounds. Some debris from the fabrication came out but once it was up to temperature it sounded awesome!
Thank You